Over the last few weeks, I have been working on photographing flowers frozen in water. I have tried this before with varying degrees of success but really wanted to devote some time to it this winter. I have found a method that works well for me and am happy to share some tips with you.
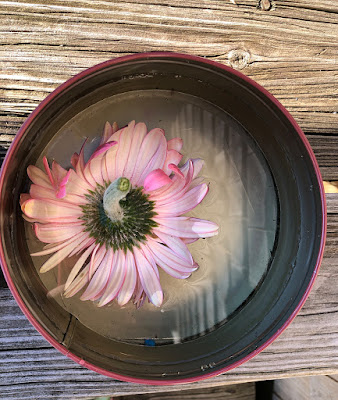
First, find a suitable container. Some people choose glass, I tried that as well as metal tins and plastic containers and found no difference. I knew I would not be shooting through the sides of the container, so glass was not a necessity, use what you have. I used some small containers for single large flowers and groups of smaller blossoms, and larger tins for bigger groups of flowers. Even a cut-off milk jug will work.
Collect some flower blossoms and trim the stems to fit the container you have chosen. The beauty of freezing the flowers is that you don't have to use pristine blossoms, I used both fresh and spent flowers and both worked well. I had better results with larger flowers.
Place the flowers in the container and add a little bit of water, you can place them with the blossoms up or stems up, or even sideways. The flowers will float if you add too much water, you really just want enough for the flowers to adhere and stop moving in the beginning, 1/2-1 inch is enough. Once you have added the small amount of water, place the container in the freezer. Here in Maine, I can place the containers outside to freeze when I run out of freezer space.
Check the progress after a few hours and add more water. Don't add too much at once or your slim ice layer will melt with the added water and the flowers will float free, it is better to keep adding frequent small amounts at a time until the flowers are covered with water. Sometimes I like to leave a few petals above the water/ice line for added interest in the photos.
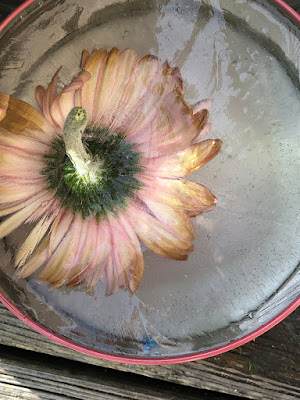
Once I am happy with the photos I made shooting straight down at the flower, I place the container upside down in a warmer location so that the ice will loosen (you could also run the container under warm water). I remove the container and check the bottom and all sides of the ice block for interesting effects and make more photos from those angles. Shooting the ice block with backlighting works well too.
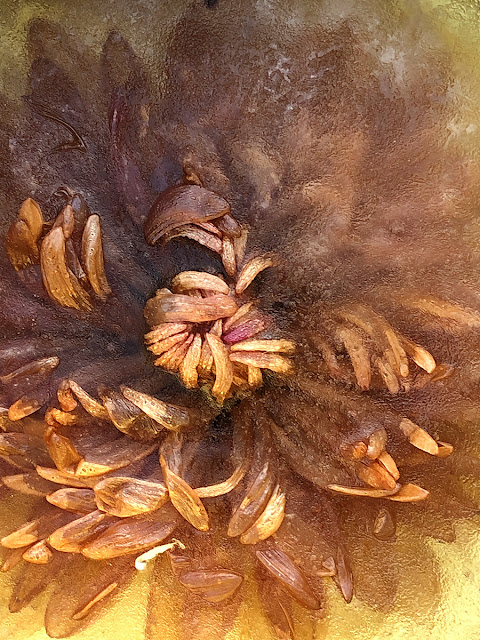
I found that some flowers turned brown when frozen, and some retained their natural colors. If you are unhappy with the color of the flower in ice, you can always convert to black and white or add a color tint as I did with this one:
I feel like I am only beginning with this technique and look forward to more experimentation and exploration, I have a full pan of red roses almost ready to shoot in my freezer right now so stay tuned.
Happy Shooting!
Kathleen


Thank you, Kathleen! I played around a little with frozen flowers this winter inspired by you! Love that you shared your techniques!
ReplyDeleteAbsolutely gorgeous. Even though I am a novice (AT BEST), I'm going to try this with my Lensbaby Velvet 85. Thanks for sharing your knowledge and unbelievable talent.
ReplyDeleteVery interesting. Your results are uniquely compelling. I am going to have to give this a go. Thank you for sharing.
ReplyDeleteThnank you Kathleen for sharing your ideas with us!
ReplyDeleteThanks for the tips. I have some flowers I froze...hmmm maybe last spring and never got out to photograph. You inspire me to do just that as we are about to be snowed in for a week (a rare event in our green and rainy Willamette Valley).
ReplyDeleteWhat fun! I have some in freezer now!
ReplyDeleteThis looks so fun. I have some flowers I bought the other day. Shooting them tomorrow so will try out your technique after that. Thanks for sharing Kathleen!
ReplyDeleteVery nice. How exquisite. TY!
ReplyDeleteGreat idea. Might have to try that, if I can find some room in my freezer.
ReplyDeleteThis is a fabulously creative blog and a gift! Thank you, Kathleen.
ReplyDeleteSo creative! Love it!
ReplyDeleteThank you Kathleen for the great inspiration. I came home from my mothers funeral with a huge bouquet of flowers. Now I can play with a new technique and have some very special photos to honor my mom.
ReplyDeleteSorry for your loss Terri but sounds like a wonderful idea.
DeleteExcellent work, really love your creativity and ideas, will have to have a stab at this myself!
ReplyDeleteThanks for sharing! Great ideas, beautiful photos!
ReplyDeleteIi can’t wait to try this effect. You always inspire. Thank you.
ReplyDeleteNow I know what I will be trying this winter!! Thanks for taking us step-by-step through the process - the results are amazing!!
ReplyDeleteCan’t wait to get started. This method really speaks to me.
ReplyDeleteVery interesting. Thanks for the instruction. I tried to shoot flowers under frosted glass but this looks much better.
ReplyDeleteBlown away! So beautiful!! I've been craving a flower shoot since creating my own backdrop boards. This is the perfect reason to buy flowers and give this a try! Can't wait now!! Thank you for the instructional "how to". You're the bestest!
ReplyDeleteVery beautiful and creative. Definitely will try.
ReplyDelete